Yoga is one of the most effective ways to relieve back pain. Whether you learn yoga exercises the tough way or go for easy 5 minutes yoga everyday, you are bound to get relief from back pain!
Back pain has become a common issue these days. Have you ever thought why? Poor posture, prolonged sitting, no activity, straight bending from your hips, slipped disc, etc. affect your back immensely. Besides, a strain in your neck also impacts the back. Showing a specific focus on strengthening the back muscles will help you avoid many health complications and not only back pain.
Usually, the back muscles don’t get enough exercise. In an attempt to negate the effects of your lifestyle, either you stay active or you strike to find a balance to schedule some physical routine, the back muscles aren’t benefitted much. In such a situation, your back is prone to many conditions, from acute pain to degenerative disc diseases.
Specific exercises for back pain relief are essential to make you free from your discomforts. Yoga for back pain is one of such techniques that will help you a lot in your quest for relief. Why Yoga? Stretching and strengthening your back muscles, amplifying the bone health and indulging yourself into tranquility! What else do you need?

What are the Yoga exercises for back pain
Yoga is an ancient practice. It is a form of therapy that heals and cures many health ailments. Yoga exercises for back involve stretching, backward bending, and twisting the body that manipulates the lower back muscles and associated organs. Yoga exercises improve the severe pain caused due to chronic conditions like degenerative discs, disc bulge, compression, etc.
Yoga exercises for back pain aims at,
- Aligning the spine as misalignment often leads to back pain
- Healing the inflammation of the muscles
- Stretching the muscles and nerves
- Strengthening and hydrating the bones
- Preventing deformity of spine and degeneration of bones
- Enable optimal blood and oxygen supply
Different types of Yoga exercises for lower back pain
There are more than 1000 basic yoga pose and millions of variations available. You have to choose the yoga exercise considering your requirement, health condition, fitness goals, degree of pain, etc.
Remember, that combination of different set of yoga exercises as a package is named differently. There is nothing called Iyengar Yoga specifically. It refers to a set of yoga poses. Similarly, there is nothing specifically called hot yoga poses, except when it is performed in a room with warm temperature.
Following are few basic types of yoga exercises that involve practicing a set of exercises for back pain.
Iyengar Yoga
Iyengar yoga is the best form of yoga you can practice if you have back and neck pain. The specific set of yoga exercises focus on alignment of the spine and involves precise moves. Properties or accessories are often used as a part of Iyengar yoga to enable flexibility, ease of practice and avoid injuries or strains.
Besides, Iyengar yoga provides easily alternatives to every pose. Alternatives to each pose enable the one with severe back pain practice the yoga with ease.
For instance, downward dog facing pose. You should stretch your entire body from your hip to the hands and bend towards the floor. Since you shouldn’t bend forward, instead of touching the floor you can stretch your body and touch the floor.
Similarly, in case of yoga poses that involve side stretches and touching the feet, you can touch the wall or place a chair.
Hatha Yoga
Hatha yoga refers to a set of yoga exercises performed in specific sequences that is designed to energize the tiny channels of the body. It also aligns your muscles, bones and skin. Above all, the core objective of hatha yoga is energizing the spine. So, that’s obvious it reduces even chronic pain and improves the health of the spine.
Hatha yoga generally involves breathing exercise, doing a specific sequence of yoga and meditation.
Asthanga Yoga
Also termed as power yoga, it is recommended only when you have rehabilitated from any injury of your back. It involves strenuous pushups, lunges, stretches, and bends and not recommended for anyone with chronic injury.
Bikram Yoga
Popularly referred as hot yoga, it refers to practicing a set of yoga exercises in a warm temperature. When the temperature is hot, it increases flexibility and eases doing the different yoga postures. It is because, the heat stretches the tissues, improves blood flow and relaxes the muscles. It also aids in detox!
Collectively, bikram yoga reduces back pain. However, you should practice bikram yoga only under guidance and supervision of a trainer.
Bikram yoga is not for people with high blood pressure or cardiovascular diseases.
Viniyoga
Viniyoga is a customized yoga designed to adapt to every individual’s concern and associated with healing back injuries.
Remember, in order to practice these set of yoga exercises for back pain, you should get training from a yoga practitioner. There are few yoga poses that are restricted when you have back pain.
Yoga Asanas for Lower Back Pain
Let us look at a few stretching and backward bending yoga poses that specifically address lower back pain. Remember, if the pain persists even after doing these yoga asanas or worsens after yoga, please stop doing these poses and consult with a yoga trainer or your physician.
1. Ardha Matsyendrasana – Half Spinal Seated Twist
It is a seated spinal twist pose that makes your spine supple and increases the elasticity. It also opens your chest and hips.

- Sit straight with legs extended and keep your feet together.
- Bend the left leg (or right leg as you wish) and place the left sole near your right hip
- Raise the right leg and place the feet over the left knee.
- Place the left hand over the right knee and thighs and keep the right hand behind your hips
- Slowly twist your waist and turn towards right
- Don’t bend your body and keep it erect
- Just stay put in this posture as long as you can
- Breathe out and slowly return back to normal position. Turn the waist, your neck, release the right hand, then left hand, right leg and then left leg.
2. Gomukhasana – Cow Pose
It is a full body stretching pose that provides great relief from pain and muscle twitches. It also strengthens your back.

- Sit on the floor with legs extended
- Bend the left leg and place it behind the right thigh
- Bend the right leg and place it over the left leg
- Make sure both the knees are placed parallel
- Bend your left hand and place the arm behind your back
- Raise your right hand and bend over the shoulder
- Try to clasp the fingers of left hand and right hand (if you cannot hold, just adjust your body and touch the fingers)
- Stay put in this position for a few seconds
3. Sishubalasana – Holding a baby pose
It is one of the effective spine strengthening pose. Regular practice of this pose prevents back injuries, stiffness and strain.

- Sit on the floor with legs widened
- Fold both the legs and place the ankle closer to the reproductive organ
- Keep your back straight and erect • Gently lift the right leg in your arms
- Hold the right leg like a baby in your hands for one or two minutes
- Repeat the same with left leg It is a relaxing yoga pose for back pain.
4. Balasana – Child Pose
It is a simple yoga pose that stretches your hip flexors, hamstrings and thigh muscles.

- Sit on your knees
- Raise your arms above your head
- Slowly bend your upper body and try to touch the floor with your head
- Pull your abdominal muscles inside
- If you can bind your body with thigh, just stretch yourself a little bit
5. Baddha Konasana - Butterfly Pose
It is a simple stretching exercise that act as hip opener, improve the thigh muscles, benefits the lumbar region and provides a lot of flexibility. It also helps strengthening the urinary bladder, pelvis and abdomen. Specially, it enables a lot of blood supply to uterus, back and abdomen. When practiced to perfection, this yoga asana reduces sciatica and reduces the heaviness of your body.

- Sit with legs extended
- Bend your legs and pull your soles together towards the pelvis
- Join your soles and lower both the knees on the floor.
- Keep your body straight and hands hold the foot
Flap your thighs as faster as you can.
As another extension, bend your body towards your toes and touch the toes with your forehead. It gives good stretch to whole body.
5 Minutes Yoga for Lower Back Pain Treatment
Whether your pain is moderate or intense, you can get relief in 5 minutes. There are certain yoga poses that provide you quick relief from the episodes of pain. Listing out the five yoga asanas as ‘5 Minute Yoga for Lower Back Pain!’ These yoga poses are very special in treating the pain and strain in the spine.
1. Supta Matsyendrasana – Reclined Spinal Twist (A Feel Good Yoga Pose)
The yoga pose is named after the sage, Matsyendra who discovered different spinal twist poses. This is one of the easy poses that provide quick relief from chronic lower back pain.
The asana squeeze your depression and anxiety away just like you squeeze a wet sponge. It stretches the whole back and tones the muscles. You will feel rejuvenated after doing this asana. After a day of strenuous work, you can easily gain balance with this yoga pose. It has many benefits, mentioned below:
- It relieves stress from your back, hip and thighs
- Hydrates the discs
- Relaxes the stress in the spine, makes it flexible and realigns the spine
- Also strengthens the abdominal muscles
- Tones the waist muscles which flush out toxins
How to do Supta Matsyendrasana

- Lie on your back with both knees bent and foot flat on the floor
- Slightly lean your hip towards the right side
- Bring your left knee closer to the chest and extend the right leg
- The left knee should be placed over the extended right leg
- Spread both your arms in line with shoulder
- If you cannot hold your left knee bent over the leg, just use your right hand to hold the knee
- Count for 10 to 20 breathes and repeat with other side
Variations to this pose
- Instead of bending your knees, you can just extend your leg, place the right ankle over left leg and lean your lower body towards left and vice versa.
- Bend your knees and put right knee over left knee and lean over the left side and vice versa.
2. Sethu Bandhasana – Bridge Pose
If you have mild to severe pain, you can effortlessly alleviate it with this easy pose. This is a therapeutic yoga for osteoporosis and chronic lower back pain. It is an invigorating yet simple pose that anyone can do.
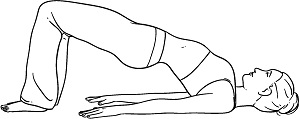
- It stretches the whole body from neck to leg
- It stimulates the central nervous system
- Good for muscles, tendons, ligaments and bones
- Strengthens the back muscles
- Stretches the muscles associated with spine radiating down to legs
- Treats aches
- Provides relief from tension, stress, migraine, etc
- An easy rejuvenation yoga
How to do Sethu bandhasana
- Lie on your back and keep your knees bent
- Keep the feet a few inches apart and make it parallel to your hips
- Place both your hands closer to your sole
- Gradually raise your hip from the floor
- Press your feet and arms and raise your upper body
- Try to lift your upper body fully where you get support by shoulders, arms and foot
Try to stay in this posture for a minute. If not, do it twice or thrice that lasts for a minute.
3. Marjariasana and Bilitasana - Cat and Cow Stretch
This is a combination of classic yoga poses that provide relief from back pain in few minutes. It involves two different types of yoga poses that moves your spine, from flexion to extension of the spine. This specific pose should go in tact with the rhythmic breathing. Without proper inhalation or exhalation, it won’t be effective.
- It makes your spine healthy and flexible
- It also tunes your abdominal muscles and reproductive organs
How to do Marjariasana and Bilitasana

- Sit on your knees and arms placed on the floor (Just like a crawling baby, but no crawling)
- The wrist should be in line with shoulder and knees should be in line with the hips
- Imagine that your spinal cord running from neck to lower back is a straight line and adjust your body like a straight line
- Keep your neck as an extension of the spine
When you inhale:
- Take a deep inhalation
- As you inhale, gradually raise your neck and bend your back, that your spine is likely to hug the abdomen
- Hold the breath four 4 counts
When you exhale:
- Take a deep exhalation
- Lower your neck and take a look at your navel
- Constrict your abdominal muscles and round your spine
- Your abdomen should hug your spine
- Hold the breath for 4 counts
Extended Cat and Cow Stretch
After practicing the inhale and exhale, you can make an extension to this pose. This extension stabilizes your joints and aligns your spine. It also adds strength to your whole body.
- Complete the cat and cow stretch
- Relax your body (stay in the same position like crawling baby)
- Extend your left arm forward and right leg backward
- Keep your body and head straight
- Hold for 5 counts
- Gradually pull your hand and leg, return back to crawling position
- Extend the right arm and left leg and repeat the same
4. Bhujangasana - Cobra Pose
Stretching is the best way to strengthen your muscles. It is a form of backward bending pose. No exercise can strengthen your back muscles than Bhujangasana. Besides, it also tones your arms and shoulders as the hands are used as support to practice this posture. It is referred as cobra pose as you will raise your head and torso like a cobra!
- Relieves the stiff lower back muscles and make your spine more flexible
- Reduces belly fat and waist line
- Stimulate the digestive organs and reproductive organs

How to do Bhujangasana
- Lie on your stomach
- Ensure your legs are placed touching each other
- Rest your palms on the floor and place it near the chest
- Raise your head and tilt head back to the maximum extent possible while you get support by pressing your palms on the floor. Stay put this position for 10 counts.
- Raise your shoulder while the abdomen touches the floor and stay for 10 counts.
- Raise your upper body until abdomen (you body shouldn’t touch the floor) and stay for 10 counts.
Repeat this asana twice or thrice.
5. Vrukshasana – Tree Pose (Single Leg Standing)
Many times, improper alignment of the spine leads to back pain. For instance, sitting in wrong posture like leaning over the table. This simple pose help you get rid of pain, align your spine, and energize your muscles.
Vrukshasana – Vruksha means a large tree!
- It reduces general body aches
- Provides quick relief from sciatica pain
- A simple hip opener pose
- Improves concentration and memory
- Imparts clarity
- Relieves tension and twitches in the nerves and back muscles
- A simple mind and body rejuvenation pose

How to do Vrukshasana
- Stand Straight and tall
- Raise your left leg, bend the knee and place the sole of the leg firmly on the right thigh
- Make sure the leg is placed correctly and ensure it is balanced
- Inhale deeply and raise both the arms
- Bring both arms together over your head and clasp it together (Say Namaste with hands)
- Look straight and stand straight
- Stay put for a few seconds
- Gradually loser your arms and repeat it with other leg.
Most people who try this asana can easily balance themselves on standing with single leg. However, the key to this asana is single leg standing with arms raised above the head. The combo of these two brings most of the benefits. If you find yourself unable to balance, take wall support.
In fact, you can mix and match any of the yoga exercises for back pain to make your own '5 minutes yoga daily session for back pain' Watch this video which shows you how to do some of the yoga asanas for back pain (that you have read above), in only 5 minutes!
5 Minutes Daily Yoga Routine for Back Pain
Easy Lazy Yoga Poses for Lower Back Pain
Sometimes you may need a trainer to practice certain yoga poses . Although yoga doesn’t cause too much pain like exercises, stretching yoga asanas may cause pain. Yet, there are few yoga poses that are quite simple and effortless to do! In fact, even the extremely lazy people can do this yoga asanas to reduce lower back pain.
1. Savasana – The Dead Pose
'Sava' means dead body! Just lie down on the floor gently and close your eyes with hands and legs wide apart. Imagine yourself your entire body is relaxed.


- Spread your hands apart and widen your legs.
- Take deep breathes and concentrate on your breath.
- Lie down for 5 minutes. You will feel relaxed and nourished.
2. Makarasana - The Crocodile Pose
This is an inversion asana of Savasana. Lie down on your belly and widen your legs as far as possible.


- Lie down yourself comfortably.
- Just like you enjoy watching a movie, place your hands on your cheeks and relax for a while.
- Alternatively, you can also put your head down.
- Place your hands below the forehead and relax for while.
3. Tadasana – Mountain Pose (Stand straight)
Tadasana is a base asana. It is the base point for many standing yoga asanas. It involves standing straight with feet touching each other. This asana tells you how to manage your posture the right way. It corrects the posture, aligns the spine and reduces the pain. It lengthens the stiff back and extends the spine.
- Stand straight
- Imagine your body a straight line
- Pull your abdominal muscles for a few seconds
- No bending and no stretching
- Take a few deep breathes
- That’s it

Variations of Tadasana
There are many variations to tadasana.
- Practice tadasana and gently inhale and raise your arms about your head. Lower your arms when you exhale.
- Inhale and raise your arms and clasp it to do namaskar mudra.
- Inhale and raise your arms. Gently bend backwards and exhale as give above.
- Do namaskar mudra by placing your arms before your chest.
- Once you master this asana, you can stand on your toes as you inhale
- You can also stretch on your left, right and back.
When you raise your arms, stretch your hands as possible as you can. This specific yoga lengthens your spine and addresses the twisted muscles, spasms, etc.
General Tips on Doing Yoga Poses for Lower Back Pain Treatment
- Start gently
- Don’t strain yourself too much to perfect a pose
- Don’t rush to master any pose – remember these words, practice makes perfect
- Try to repeat a pose 4 or 5 times and hold a certain pose for 10 to 20 counts without straining yourself
- Don’t do any straight bending or forward bending yoga pose (You can do some side stretches)
- You will feel acute to moderate pain in your thighs and calf muscles for a few days. It will ease off automatically in 3 or 4 days.
- Always start doing yoga with deep breathing exercise for five minutes
- End your yoga practice with a meditation for 2 minutes
Still thinking, what yoga exercises to do for back pain! Have a look at these 5 Best Yoga Exercises for Lower Back Pain
Tidak ada komentar